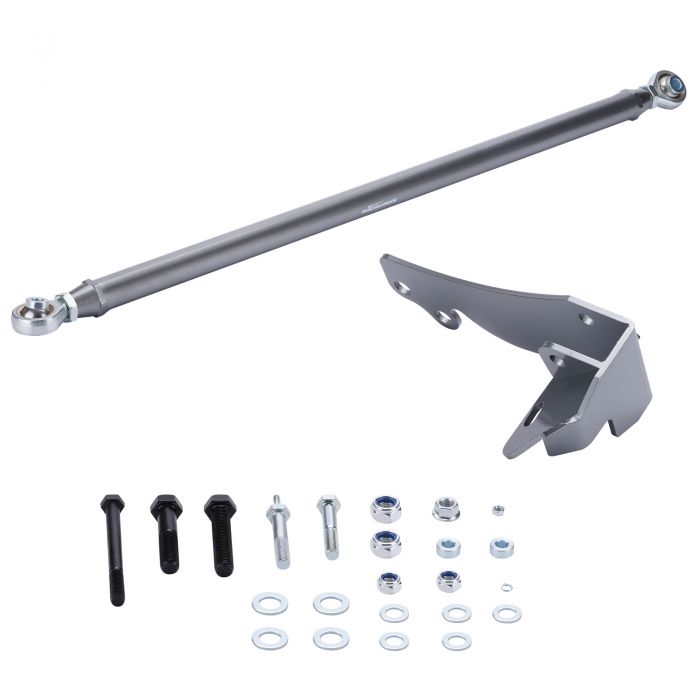
Adjustable Track Bar Rod 0- 4 Lift compatible for Dodge Ram 2500 3500 1994-2002 4X4 4WD
SKU
3002913131
<p> </p>
<p><span><span><span><strong><span>Application:</span></strong></span></span></span></p>
<ul>
<li><span><span>1994-2001 compatible for Dodge Compatible for Ram 1500 4x4 4WD ONLY</span></span></li>
<li><span><span>1994-2002 compatible for Dodge RAM 2500 4X4 4WD ONLY</span></span></li>
<li><span><span>1994-2002 compatible for Dodge RAM 3500 4X4 4WD ONLY</span></span></li>
</ul>
<p> </p>
<p><span><span><span><strong><span>Selling Points:</span></strong></span></span></span></p>
<ul>
<li><span><span>-Increased off-road capability</span></span></li>
<li><span><span>-Elimination of the death wobble</span></span></li>
<li><span><span>-Lifted Jeeps are recommended to have adjustable track bars</span></span></li>
<li><span><span>-Reduce rollover risk</span></span></li>
<li><span><span>-Center your axle</span></span></li>
</ul>
<p> </p>
<p><span><span><span><strong><span>Specification:</span></strong></span></span></span></p>
<p><span><span><span>Color: Gray</span></span></span></p>
<p><span><span><span><span>Ride Height: 0"- 4" Lift</span></span></span></span></p>
<p><span><span><span><span>Material of the Joints: alloy</span></span></span></span></p>
<p><span><span><span><span>Track Specs: the center of heim to the center heim : MIN: 925mm / MAX:1025mm</span></span></span></span></p>
<p><span><span><span><span>Rod thickness: φ35 </span></span></span></span><span><span>Rod Length: 870mm</span></span></p>
<p><span><span><span><span>Item Weight :7.82kg</span><br>
<span>Package dimension : 99*16*16cm</span></span></span></span></p>
<p><span><span><span>Warranty: </span> one year for any manufacturing defect</span></span></p>
<p> </p>
<p><span><span><span><strong><span>Description:</span></strong></span></span></span></p>
<ul>
<li><span><span>Powder coated gloss black for a brilliant and durable finish.</span></span></li>
<li><span><span>Adjustable Heavy Duty Carbon Steel Track (Compatible for Panhard) Bar* and Relocator Bracket</span></span></li>
<li><span><span>Tubular Design with Self-Lubricating Bushings for Easy Maintenance, Stability & Strength.</span></span></li>
<li><span><span>Relocator Bracket also made from Heavy Duty Carbon Steel.</span></span></li>
<li><span><span>Ensures Proper Axle Location & Performance with Track Bar Relocator Bracket</span></span></li>
<li><span><span>Reduces, in most cases eliminates, "Death Wobble" (Axle Shake)</span></span></li>
<li><span><span>Most Drivers experience an Increase of Steering Comfort</span></span></li>
<li><span><span>Compatible with most aftermarket lift kits**</span></span></li>
</ul>
<p> </p>
<p><span><span><span><strong><span>Feature:</span></strong></span></span></span></p>
<p><span><span>*Easy 100% bolt in installation with the use of basic hand tools. No cutting or welding is required.</span></span></p>
<p><span><span>*Adjustable: Accommodates from 0"-4" of Vehicle Lift.</span></span></p>
<p><span><span>*Tubular Design with Self-Lubricating Bushings for Easy Maintenance, Stability & Strength.</span></span></p>
<p> </p>
<p><span><span><span><strong><span>Package Includes:</span></strong></span></span></span></p>
<ul>
<li><span><span>1x Heavy Duty Carbon Steel Adjustable Track bar</span></span></li>
<li><span><span>1x Bracket (6mm thickness)</span></span></li>
<li><span><span>5x Bolts (1x Combination bolt \ 4xHexagon head bolts)</span></span></li>
<li><span><span>Several gaskets</span></span></li>
</ul>
<p><span><span> (As picture shown)</span></span></p>
<p> </p>
<p><span><span><span><strong><span>Note:</span></strong></span></span></span></p>
<p><span><span><strong><span>* This is aftermarket replcement part. It can only be installed with a bracket. The hole position of the bracket needs to be drilled separately.</span></strong></span></span></p>
<p><span><span>* Instruction is not included. Professional installation is highly recommended.</span></span></p>
<p> </p>
<p><span><span><span><strong><span>Installation instructions:</span></strong></span></span></span></p>
<p><span><span><strong>1</strong>. Remove stock track bar. Using an socket remove the passenger’s side bolt</span></span><span><span> </span></span></p>
<p><span><span> On the driver’s side mount you will need to remove the cotter pin. Then using a wrench, loosen and remove the castle nut. </span></span><span><span>Finally using a joint fork pry the track bar away from the frame mount.</span></span></p>
<p><span><span><strong>2. </strong> You should be able to remove the track bar now. Using a bristle brush, clean out the inside of the driver’s side track bar mount. As well, clean the lower face around the hole. Clean the outside frame rail where the retrofit bracket will mount.</span></span></p>
<p><span><span><strong>3.</strong> Align the support brackets and take the fork of the pan-har rod as a reference. Be careful not to make the right or wrong direction. Install the nuts one by one and tighten them. </span></span></p>
<p><span><span><strong>4.</strong> Locate the existing hole just below the ground strap. Drill bit and thru drill this hole to through the other side of the frame.</span></span></p>
<p><span><span> The drill hole must be level. Once through, deburr the exit hole. Mounting nut</span></span></p>
<p><span><span><strong>5. </strong>Fix the brake line.</span></span></p>
<p><span><span><strong>6</strong>. Adjust the track bar to a suitable length, and fix the nut.</span></span></p>
<p> </p>
<p><span><span><span><strong><span>FAQ:</span></strong></span></span></span></p>
<p><span><span>1. Q: What size hiem joints are in this kit? I would like purchase asap. Just need to know what size hiem joints first.</span></span></p>
<p><span><span> A: φ 20mm</span></span></p>
<p><span><span>2. Q: Does this traction bar have left and right threads, to adjust while installed, and does it have locking nut sand all the proper hardware?</span></span></p>
<p><span><span> A: Unilateral adjustment.</span></span></p>
<p><span><span>3. Q: Could you please let me know how long this track bar is? Minimum and maximum length.</span></span></p>
<p><span><span> A: (The Center of Heim to The Center Heim) Minimum: 925mm Maximum:1025mm</span></span></p>
<p><span><span>4. Q: How to install the bracket? instruction or even something that tells the proper placement.</span></span></p>
<p><span><span> A: Replace the Ball joints placement of the OE Product.</span></span></p>
<p><span><span>5. Q: </span></span><span><span>Is this adjustable when mounted in place?</span></span></p>
<p><span><span> A: Recommended to adjust well before Installation</span></span></p>

